Kotlin/Native and Xcode integration insights
Kotlin/Native has become a truly considerable solution for the iOS and Android apps that share pieces of common business logic. From Kotlin source code developers can generate not Android but also iOS, macOS and even WatchOS devices.
Kotlin/Native is a technology for compiling Kotlin code to native binaries, which can run without a virtual machine. It is an LLVM based backend for the Kotlin compiler and native implementation of the Kotlin standard library. Kotlin/Native is primarily designed to allow compilation for platforms where virtual machines are not desirable or possible, for example, embedded devices or iOS. It solves the situations when a developer needs to produce a self-contained program that does not require an additional runtime or virtual machine.
In this story I would like to focus on enabling basic developer toolset in Xcode-based environment for Kotlin/Native development. I would be happy to share some lessons I have learned integrating Kotlin/Native with the Xcode project.
Despite still developing, nice support for developing in Kotlin provided by Android Studio or AppCode there are still many folks that prefer their well-established Xcode-based routines. They may have various reasons for that: Xcode is free and pretty good IDE, so they might not see the need of purchasing other software, they may simply prefer running stuff on iOS devices or it may be just a personal tool preference. Sometimes it also may be a requirement to solve the problem that lays somewhere in between Swift and Kotlin.
I would like to briefly present how to set up the Xcode project to support Kotlin/Native building, running and debugging. Following that article requires some basic knowledge on Xcode project organisation and concepts but I tried to do my best to explain all key concepts.
The complete project from this story is available at my github. You may wish to clone it at some point.
First, let’s set up some very basic Kotlin Project. That is needed to set some context. It may be especially helpful for folks that have not worked with Gradle-based projects before, however, we are not going to dive deep into Kotlin/Native setup details.
My initial directory structure is going to be as below. As we are dealing with Gradle-based configuration it is essential to get your instance of Gradle wrapper. Here you can find more info and examples on that as we are not going to cover it. To start it may be enough to use the one contained in sample repository I have linked above.
.
├── KotlinNativeFramework
│  ├── build.gradle.kts
│  └── src
│      └── commonMain
│          └── kotlin
│              └── KotlinNativeFramework.kt
└── Supporting Files
    ├── build.gradle.kts
    ├── gradle
    │   └── wrapper
    │       ├── gradle-wrapper.jar
    │       └── gradle-wrapper.properties
    ├── gradlew
    └── settings.gradle.kts
It is relevant to add the reference to KotlinNativeFramework directory as a one containing project. We do that in settings.gradle.kts.
pluginManagement {
    repositories {
        gradlePluginPortal()
    }
}

enableFeaturePreview("GRADLE_METADATA")

include(":KotlinNativeFramework")
project(":KotlinNativeFramework").projectDir = file("../KotlinNativeFramework")
rootProject.name = file("..").name
The configuration inside KotlinNativeFramework’s build.gradle.kts file is relatively simple too as it just defines basic options allowing constructing a solution targetting Device and Simulator. Gradle will later use that definition to configure all needed targets for us.
While using Kotlin/Native typically we define targets separately for each supported architecture: arm64, armX64 respectively for iOS, watchOS and tvOS. With version 1.3.60, the kotlin-multiplatform plugin provides shortcuts that automate such a configuration: they let users create a group of targets along with a common source set for them with a single method. Therefore we use ios shortcut which defines targets for both iOS device and simulator architectures.
To understand the configuration below it is important to understand that a Kotlin/Native target is compiled down to a .klib library. That artifact can be consumed by Kotlin/Native itself as a dependency but cannot be executed. Similarly, it can not be a native library. To declare final native binaries like frameworks or shared libraries we are going to use the “binaries” property of a native target. This property represents a collection of native binaries produced for this target in addition to the default .klib. They can be a product or test executables, shared and static libraries and frameworks.
In the snippet below we have defined a framework artifact. Our configuration is indeed very basic, but the framework factory method‘s lambda expression allows passing more advanced options related to e.g. compilation and linking process.
plugins {
    kotlin("multiplatform") version "1.3.61"
}

repositories {
    mavenCentral()
}

kotlin {
  ios {
    binaries {
      framework {
        baseName = "KotlinNativeFramework"
      }
    }
  }
}

tasks.withType<Wrapper> {
  gradleVersion = "5.3.1"
  distributionType = Wrapper.DistributionType.ALL
}
Finally, our project will contain just a single Kotlin class.
class KotlinNativeFramework {
    fun helloFromKotlin() = "Hello from Kotlin!"
}
Kotlin/Native project we have just configured gives us a possibility to be easily built as a framework, which we could embed into an iOS app. However, it seems cool to have the possibility to have Kotlin source changes immediately reflected in the iOS app build without having to trigger any stuff by hand. This is what are we going to do now.
At that point we are all set with basic setup and we can proceed to the actual Xcode integration part.
For those who are interested in getting more details on Kotlin/Native interoperability with Objective-C and Swift I truly recommend diving into official docs as they are really valuable.
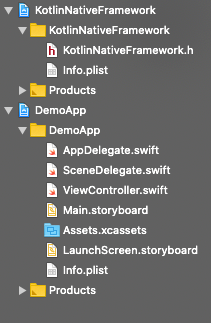
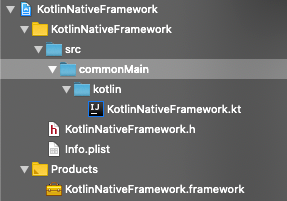
First, let’s create a Single View Application Xcode project. At that point my directory tree looks like the one below.
.
├── DemoApp
│   ├── AppDelegate.swift
│   ├── Assets.xcassets
│   ├── Base.lproj
│   ├── Info.plist
│   ├── SceneDelegate.swift
│   └── ViewController.swift
├── DemoApp.xcodeproj
│   ├── project.pbxproj
│   └── xcuserdata
├── KotlinNativeFramework
│  ├── build.gradle.kts
│  └── src
└── Supporting Files
    ├── build.gradle.kts
    ├── gradle
    ├── gradlew
    └── settings.gradle.kts
To integrate our multiplatform framework we will use a dummy wrapper project that will under the hood call Gradle, build all the stuff and finally place it in the proper location. Sounds easy, doesn’t it? Let’s then create that wrapper framework! > I like and recommend using Xcode workspaces to organize projects. They are yet simple yet powerful. This is what I did here — I have put both projects into a single workspace.
As we are not going to use much of standard XCode mechanics — we can safely delete all build phases. To do so, select your framework’s project main target, navigate to Build Phases tab and delete all entries.
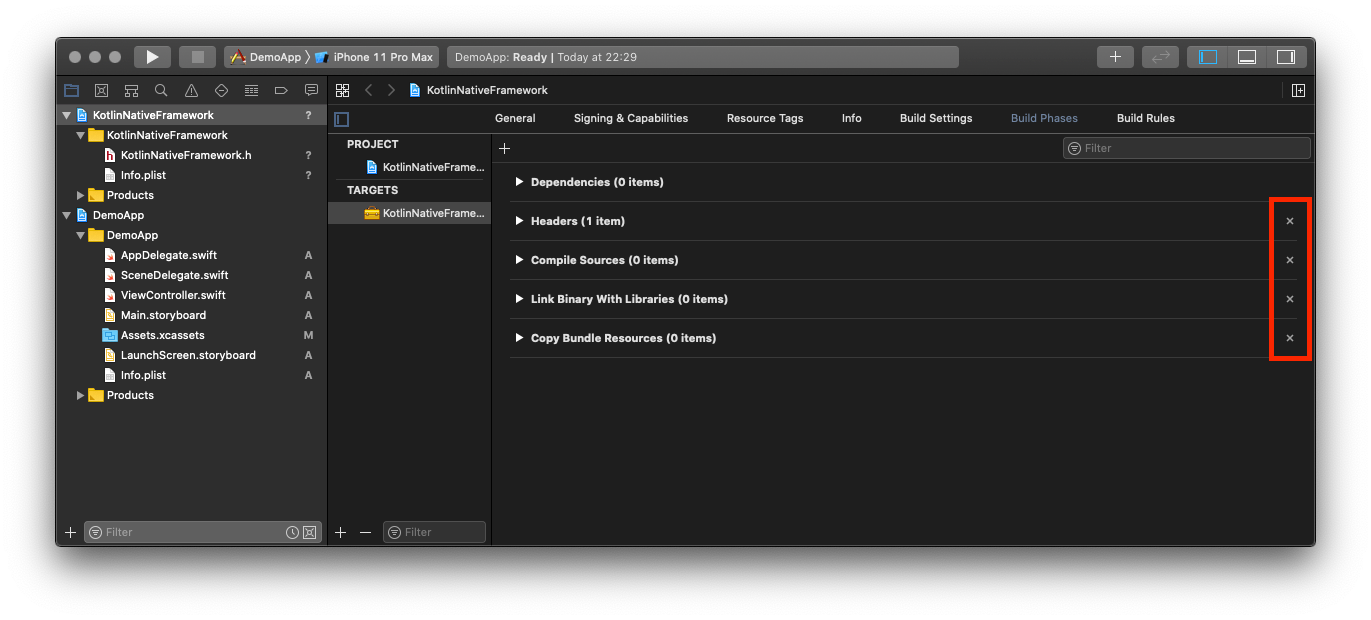
The only build phase we are going to need now is Run Script Phase. It is going to invoke some Gradle magic we will define in a moment. So, let’s add it now. After creating the phase let’s configure it to call a simple script file. I have put it inside Supporting Files directory and named build_framework.sh.
I prefer to have my Run Script Phases contain only absolute minimum and keep all substantial content in source files. That makes tracking further changes way easier as they are easily visible and readable in opposite to the changes into Xcode project files.
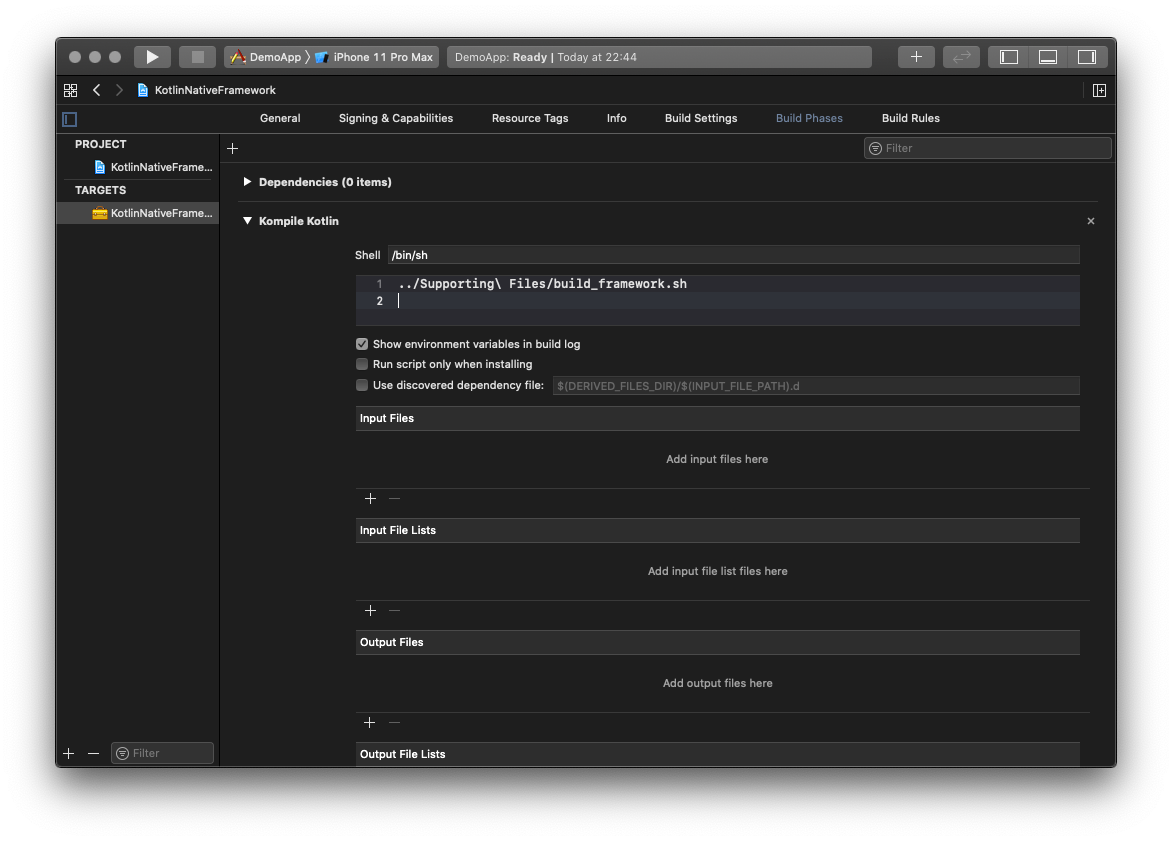
The most relevant part of the process is setting up a few Gradle tasks that will handle building the proper flavour of our Kotlin/Native framework and copy it to the right destination. That may seem pretty complicated as you can imagine rewriting whole parts of Xcode build system but luckily Kotlin/Native handles that for us. All Xcode build settings are exposed to the script we run from Run Script Phase. They are accessible as system environment variables so we can get their values really easily.
While implementing this tasks for the first time — a small xcode-compat repo from JetBrains Team was a invaluable resource. Be sure to check it and give those guys a well-deserved star for sharing their code.
As I just mentioned — all build settings are available through System.getenv() invocations. To determine the needed framework flavor we read build Configuration type and the target platform. With these two values we can decide if Debug or Release configuration should be built and properly set it’s destination. With that knowledge we can just pick a KotlinNativeTarget instance and access the task that is responsible for building it.
Once we have determined the task, we will use it as a dependency for the tasks we are about to define. There is nothing to do with actual building the framework as our dependency handles everything. Our tasks have to simply copy both framework and its accompanying dSYM file from their build destination to the place in which there are expected to be placed by Xcode project config.
import org.jetbrains.kotlin.gradle.plugin.mpp.KotlinNativeTarget

plugins {
    kotlin("multiplatform") version "1.3.61"
}

repositories {
    mavenCentral()
}

kotlin {
  ios {
    binaries {
      framework {
        baseName = "KotlinNativeFramework"
      }
    }
  }

  val configuration = (System.getenv("CONFIGURATION") ?: "Debug").capitalize()
  val platform = System.getenv("PLATFORM_NAME") ?: "iphoneos"
  val target = (if (platform == "iphoneos") targets["iosArm64"] else targets["iosX64"]) as KotlinNativeTarget
  val frameworkLinkTask = target.binaries.getFramework(configuration).linkTask
  val frameworkFile = frameworkLinkTask.outputFile.get()
  val frameworkOutputDir = File(System.getenv("CONFIGURATION_BUILD_DIR") ?: projectDir.path)

  val dsymTask by project.tasks.creating(Sync::class) {
      group = "build"
      dependsOn(frameworkLinkTask)
      val outputDSYM = File(frameworkFile.parent, frameworkFile.name + ".dSYM")
      from(outputDSYM)
      into(File(frameworkOutputDir, outputDSYM.name))
  }
  val buildForXcode by project.tasks.creating(Sync::class) {
      group = "build"
      dependsOn(dsymTask)
      from(frameworkLinkTask.outputFile)
      into(File(frameworkOutputDir, frameworkFile.name))
  }
}

tasks.withType<Wrapper> {
  gradleVersion = "5.3.1"
  distributionType = Wrapper.DistributionType.ALL
}
Then, let’s just add our task invocation to the build_framework.sh and we are almost good to go. The last thing to do is to set up a dependency to our framework.

You can now run the app. It should compile and the framework is now bundled inside the app. Yeah! 🎉
For the sake of completeness — let’s just add our Kotlin/Native method invocation inside the app delegate to ensure that everything works fine.
import KotlinNativeFramework
import UIKit

@UIApplicationMain
class AppDelegate: UIResponder, UIApplicationDelegate {


    func application(_ application: UIApplication, didFinishLaunchingWithOptions launchOptions: [UIApplication.LaunchOptionsKey: Any]?) -> Bool {
        print(KotlinNativeFramework().helloFromKotlin())
        return true
    }
It is done! Congratulations! We have just integrated our Kotlin/Native framework with the Xcode project 👏 .
Hands on debugging
That would be enough if things were just working from the first run. But it is not a thing in real-world scenarios. We need a debugger. In my scenario — as I tend to use Android Studio for writing larger Kotlin fragments — it was enough to have the possibility to set a couple of breakpoints and see basically-highlighted Kotlin syntax in my Xcode window.
Here comes Touchlab’s great third-party Xcode plugin xcode-kotlin. These folks did an amazing job by enabling Kotlin support from Xcode! Moreover, that awesome tool comes with really neat docs and a two-command setup.
It is valuable to mention a nice Xcode feature that makes devs life easier. While importing the source files into an Xcode project — you can select the option to create folder references. In our scenario — it does the job as it allows us to track all new files without the need of adding them to the Xcode project by hand.
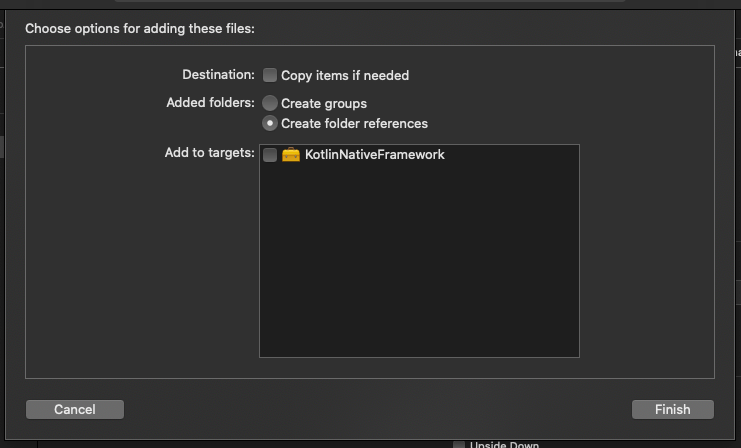
From debugging perspective it is valuable to have at least “src” directory added to the Xcode project, so let’s add it! From now it does not matter how we add and edit Kotlin source files — everything is synced and visible inside our Xcode project.
After following the setup — we can simply run the app and see that breakpoints set in Kotlin sources simply work.
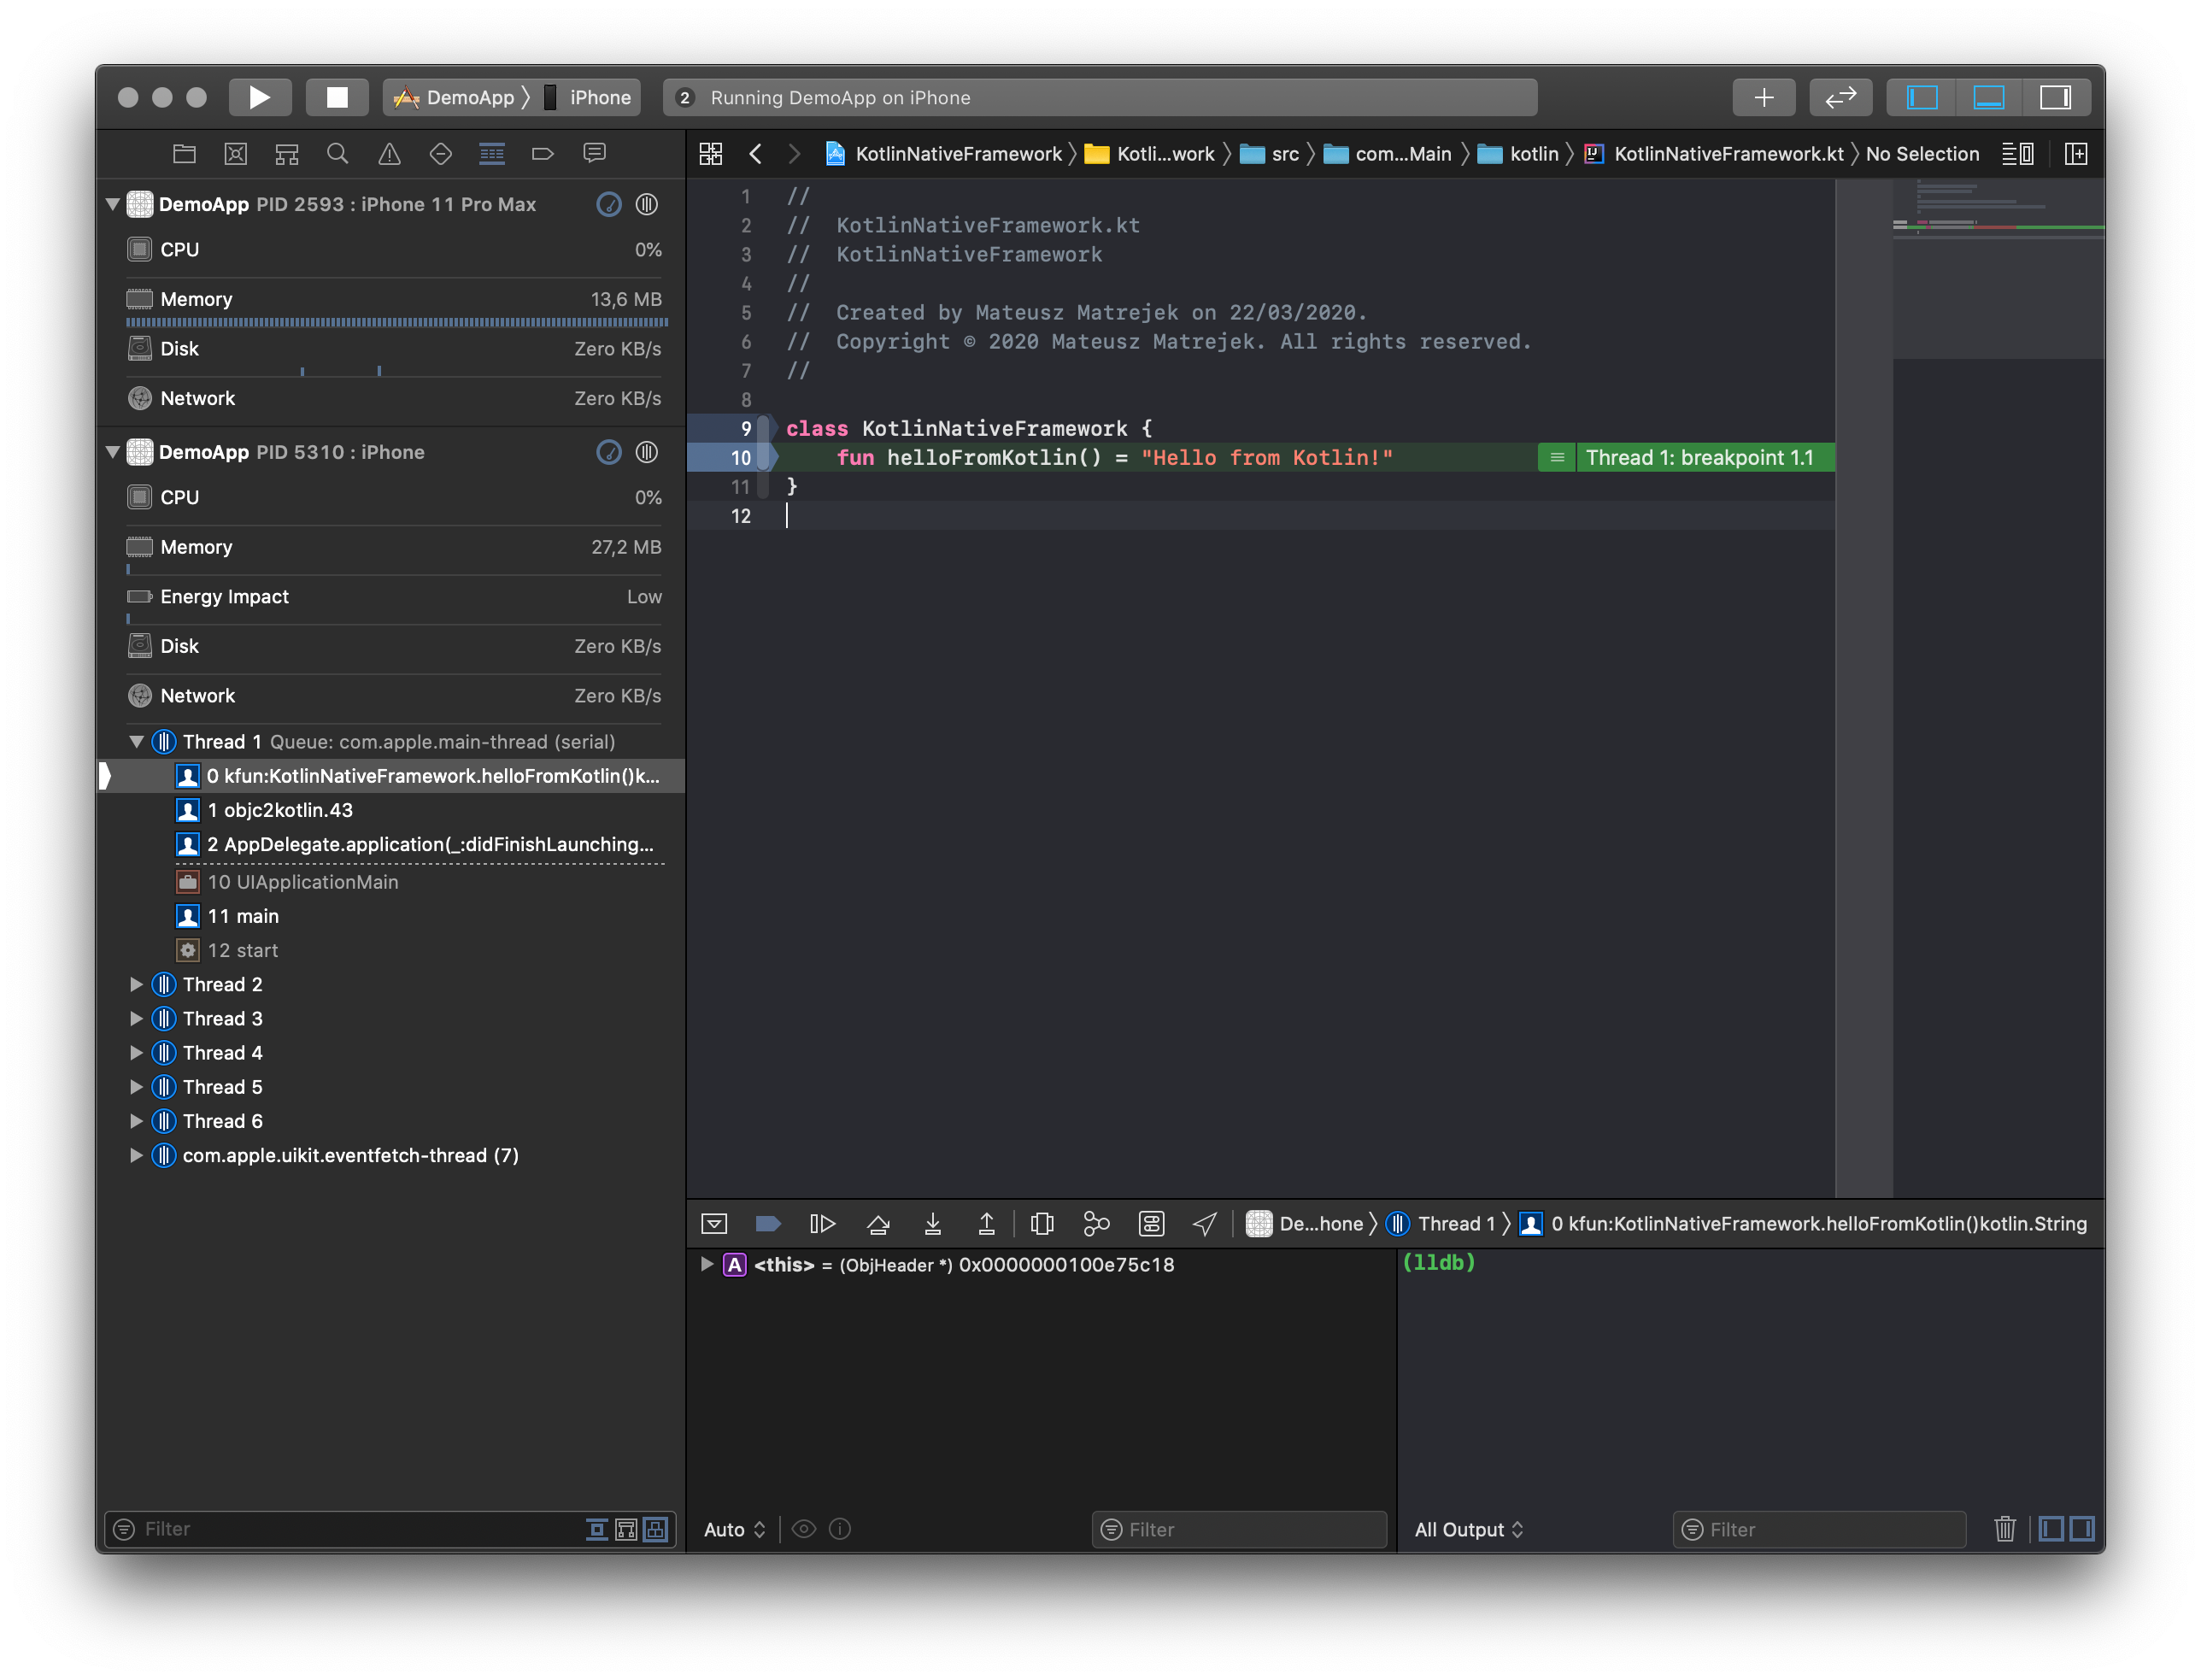
Code completion is not a case now, but we are able set a breakpoint and debug Kotlin/Native sources with the ease of debugging Swift files.
Let's make it fast
In the last part I would like to focus on the topic that is important for all of us. It is a developer experience. With relatively simple setup: building a simple, single-class Kotlin framework and embedding it inside a trivial iOS app does not result in a quite significant build time increase.
In my case, with a much bigger project with other frameworks depending on the Kotlin/Native one — each time we hit the “Run” button we experienced significant build times. Just think about these hundreds of wasted minutes of people waiting for their builds to complete.
After initially ignoring that issue — my irritation was arising with each build. It was especially visible as the project I was working on had some significant amount of configuration Gradle routines and even simple run took a couple of seconds. Additionally, the abovementioned Xcode integration also resulted in rebuilding some of the dependant frameworks making the build longer and longer…
As the Kotlin/Native was integrated into my Xcode build as a Run Script Phase it was possible to tweak that script to have some basic change detection, which would take a fraction of the time needed for starting Gradle.
The approach I took was to generate checksums for relevant source files and store them for each successful build at a temporary location. The following builds were supposed to generate the checksum for the same files, compare with the stored ones and run the Gradle build only when it was needed. That resulted in expanding the build_framework.sh script into a little bit more complex solution.
#!/bin/sh

set -e

CHECKSUMS_FILE=$CONFIGURATION_BUILD_DIR/kotlin.checksums

buildConstellation(){
./gradlew buildForXcode
# Store CURRENT_CHECKSUMS for future builds
echo "Storing checksums for future builds..."
echo $CURRENT_CHECKSUMS > $CHECKSUMS_FILE
}

# Calcuclate checksums for c11n sources
FILE_PATHS=`find ../KotlinNativeFramework/src -type f -name "*.kt" -or -name "*.kts" | sort`
CURRENT_CHECKSUMS=`shasum $FILE_PATHS`

# Read checksums from previous build
if [[ -f "$CHECKSUMS_FILE" ]]; then
INITIAL_CHECKSUMS=$(cat $CHECKSUMS_FILE)
# Check if current checksums are different than the stored ones
OLD_HASH=$(echo -n $INITIAL_CHECKSUMS | shasum | awk '{print $1}')
NEW_HASH=$(echo -n $CURRENT_CHECKSUMS | shasum | awk '{print $1}')

if [[ "$OLD_HASH" == "$NEW_HASH" ]] ; then
echo "Checksums not changed. Will use existing Gradle build..."
else
echo "Checksums have changed. Triggering Gradle build..."
buildConstellation
fi
else
echo "Checksums file does not exist. Triggering Gradle build..."
buildConstellation
fi
That implementation for sure does not cover all the possible cases that may arise during development but for us it was a significant improvement. Of course, the same improvement was possible to be achieved with other approaches like modifying existing Gradle routines but I find the way I have done it valuable to share as it may help sort out a whole variety of similar problems.
Wrap up
I hope that you found the above stuff useful and inspiring for setting up your projects using Kotlin/Native. I am aware that the developer toolkit for that stack is still under development but with a bit of effort we can achieve a really useful setup.
Thanks for reading!