Reading application entitlements with Swift
For a significant part of my (still relatively short) career I have been involved in framework development. The solution I was working on had to be bullet-proof and safe as it was supposed to be embedded inside any iOS application. Moreover, the whole integration had to be possibly simple and minimalistic. Building such a solution was not always a trivial thing, but for sure it was a rewarding task. To safely perform some operations like e.g. swizzling, adding or removing methods in runtime it is valuable to gather some information on the app actual configuration. Application’s entitlements are an invaluable source of useful information.
In this story I would like to show how to access them in the runtime. First, I will give you some context on why you may need that, then I will do my best to show you in a simple way how iOS binary file looks like and finally we would put our hands on actual code.
Why would one need to read the entitlements?
That being said — let’s define some context as at this point many of you may wonder how reading entitlements could help a framework developer to create a quality solution. My favorite example is creating an SDK that provides, among other features, transparent push notification registration. That seems to be a rather straightforward thing, we may simple swizzle app delegate methods, gather the token, processes it and we are done. For sure, that would work, as we know how to swizzle methods safely. But here comes the case, where the app that integrates the solution we deliver does not use push notifications. If we would have designed the solution as above — the user will get a validation warning while submitting the app to the AppStore.
Missing Push Notification Entitlement — Your app appears to register with the Apple Push Notification service, but the app signature’s entitlements do not include the “aps-environment” entitlement. If your app uses the Apple Push Notification service, make sure your App ID is enabled for Push Notification in the Provisioning Portal, and resubmit after signing your app with a Distribution provisioning profile that includes the “aps-environment” entitlement.
I was deeply surprised when I got that for the first time as I was not even thinking about using notifications and my app had nothing to do with it. After investigating the problem — I found out that one of the libs added some push-related methods using swizzing that triggered that particular warning. If that framework was at that time able to check if they are needed — the warning wasn’t a thing. This is just a single case that could be addressed with knowledge about app entitlements. The other one I can imagine is a situation in which a library may need to act differently depending on the presence of shared keychain groups.
I have to admit that I was never passionate about all these low-level stuff but once I had an opportunity to work on some tasks related to reading entitlements it brought me some kind of basic knowledge on how iOS binary file is structured. I remember how I was slowly going through various docs and header files connecting the dots to deliver my task. After all — it was surely that kind of satisfying knowledge that you would rather not use every day, maybe not even every month but it gives you that pleasant satisfaction of being aware of the internals of the tool you use.
The (very) short story about Mach-O binary
When I was at the early stage of my task I have been googling for some advice on the right approach to the topic of reading entitlements. I have found some drafts and complete solutions in various languages but at that point, even reading the solutions, it was hard for me to understand the “why” behind the idea. The missing part was catching on the basics of the Mach-O structure. This is where I would like to start an essential part of my story. Before putting our hands on code — let’s build some context. In the introduction below I refer to some data structures defined inside mach-o/loader.h which could be found at that Apple website as well as inside macOS SDK. In Swift it could be imported as MachO.
Mach-O, short for Mach object file format, is a file format for executables, object code, shared libraries, dynamically-loaded code, and core dumps. A replacement for the a.out format, Mach-O offers more extensibility and faster access to information in the symbol table. Mach-O is used by most systems based on the Mach kernel. NeXTSTEP, OS X, and iOS are examples of systems that have used this format for native executables, libraries and object code.
Basically, Mach-O is just a binary file. We can divide it into three major areas:
- Mach-O Header is placed at the beginning of every Mach-O file. It is a structure that alows to define the file as a Mach-O file. Apart from that the header also contains other information like the target architecture flags specifying options that affect the way in which contents of the binary file should be interpreted. Header can be described with on of two structures:
mach_headerandmach_header64. If the binary is targeting 64-bit architectures — themach_header64is used, otherwise we should expectmach_header.
/*
 * The 32-bit mach header appears at the very beginning of the object file for
 * 32-bit architectures.
 */
struct mach_header {
    uint32_t    magic;        /* mach magic number identifier */
    cpu_type_t    cputype;    /* cpu specifier */
    cpu_subtype_t    cpusubtype;    /* machine specifier */
    uint32_t    filetype;    /* type of file */
    uint32_t    ncmds;        /* number of load commands */
    uint32_t    sizeofcmds;    /* the size of all the load commands */
    uint32_t    flags;        /* flags */
};

/*
 * The 64-bit mach header appears at the very beginning of object files for
 * 64-bit architectures.
 */
struct mach_header_64 {
    uint32_t    magic;        /* mach magic number identifier */
    cpu_type_t    cputype;    /* cpu specifier */
    cpu_subtype_t    cpusubtype;    /* machine specifier */
    uint32_t    filetype;    /* type of file */
    uint32_t    ncmds;        /* number of load commands */
    uint32_t    sizeofcmds;    /* the size of all the load commands */
    uint32_t    flags;        /* flags */
    uint32_t    reserved;    /* reserved */
};
Here we can see an otool output (a command displays specified parts of object files or libraries)for a header of my iOS app:

It seems a little bit mysterious but let’s decrypt it! We will need to have a look at loader.h header I already mentioned. By examining the header we can see that the magic value is equal to MH_MAGIC_64, which leads to the conclusion that we are dealing with a 64-bit binary. We may even check by looking into mach/machine.h that the exact CPU architecture for that binary is Arm64. Going further, we can see that that binary is an executable as its filetype is equal to the value that matches MH_EXECUTE constant (see loader.h again).
As a side note, but still worth mentioning — there is also possible to create a binary that contains code for more than one architecture — often referred to as “chunks”. Such a file — called a fat binary — always begins with a fat_header, which is followed by fat_arch structures. They define the target architecture of each chunk and point to the actual data for the architectures contained in the file. Each architecture chunk organization is congruent with a single architecture Mach-O. It is also worth noticing that for historical reasons — all data in these data structures are stored in big-endian byte order.
- Load Commands immediately follow Mach-O header. It is a series of structures of variable size. They act as a specification for the logical file structure and describe the layout of the file in virtual memory. All of these commands contain common fields that are defined as load_command structure. That structure contains
cmdfield that specifies the type of load command and thecmdsizewhich is an integer specifying the total size in bytes of the load command data structure.
struct load_command {
    uint32_t cmd;        /* type of load command */
    uint32_t cmdsize;    /* total size of command in bytes */
};
In the previous otool output you may have observed that the binary consisted of 47 load commands. They could be easily listed by running otool with -l switch and output for each of them would be similar to the one below.
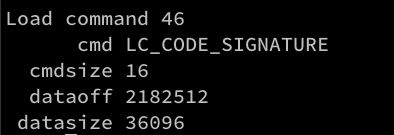
Some of load commands, as LC_CODE_SIGNATURE are being defined by linkedit_data_command structure that, apart from cmd and cmdsize, contains the offsets and sizes of a blob of data in the link edit (_LINKEDIT) segment located in third major part of a Mach-O file.
struct linkedit_data_command {
    uint32_t    cmd;        /* LC_CODE_SIGNATURE, LC_SEGMENT_SPLIT_INFO,
                                   LC_FUNCTION_STARTS, LC_DATA_IN_CODE,
                   LC_DYLIB_CODE_SIGN_DRS or
                   LC_LINKER_OPTIMIZATION_HINT. */
    uint32_t    cmdsize;    /* sizeof(struct linkedit_data_command) */
    uint32_t    dataoff;    /* file offset of data in __LINKEDIT segment */
    uint32_t    datasize;    /* file size of data in __LINKEDIT segment  */
};
Linkedit data command is not the only structure available for working with load commands sections. In loader.h we can find structs representing other commands — just to mention UUID, RPATH and Encryption.
- Several segments of data make up the last part of the Mach-O binary file. Each of the segments is internally divided into zero or more sections, which contain either the code or some other binary data serving special purposes. From our perspective — the most relevant segment is located at the very end of binary. It’s a link edit segment we mentioned earlier. This segment contains the tables of link edit information: the symbol table, string table and particularly it may contain a code signature we are going to read.
This was a very basic introduction to the Mach-O binary file format but it should be enough for us.
If you want more info on Mach-O file format— be sure to check that repository. It contains loads of great stuff from Apple docs that are no longer present on official documentation websites.
To be successful within our goal we also need to find out a bit about the signature itself as it also has its well-structured format. As we previously noted: LC_CODE_SIGNATURE load command points to the signature data inside the link edit segment. That part of binary starts with yet another magic field followed by its length and a size value indicating the number of following blobs. Some implementations group them all into a single structure called super blob. These child blobs are yet another structs that describe their purpose by the value of the magic field and reference the data representing their logical content. They may define e.g. Code Directory, Entitlements or Signature.
It is important to mention that in that part all values are, similarly to the ones from fat_header, saved as Big Endian — again, it’s a thing dating back to PowerPC era but it is relevant as we are going to use these values while implementing our solution.
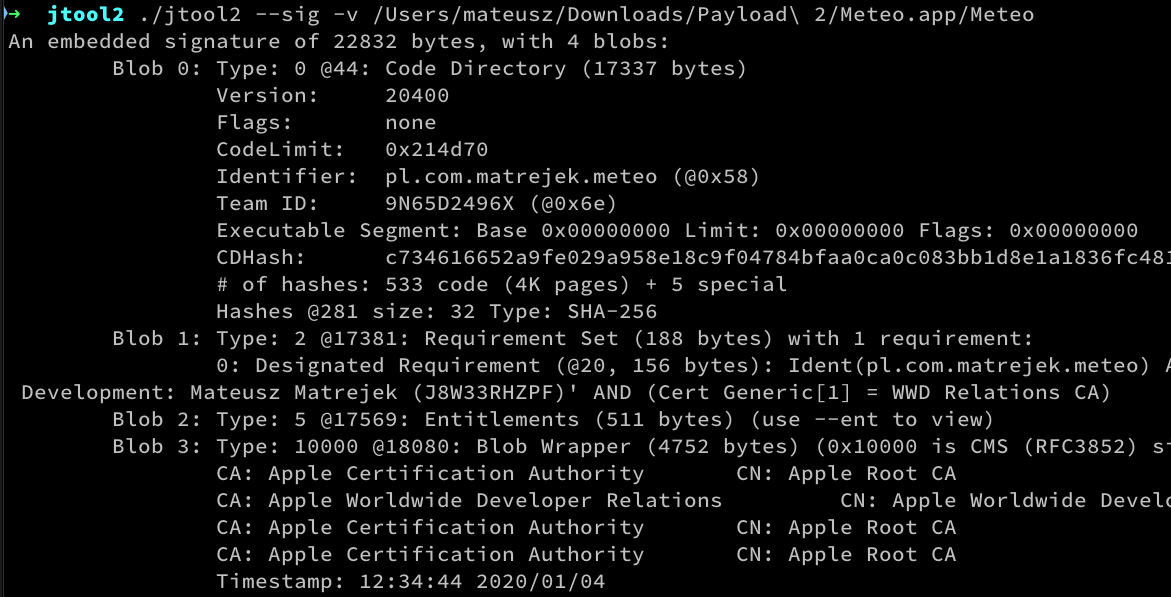
For a more practical example — let’s analyze the output from jtool2 (which is like otool but has some additional cool options) for one of my iOS binaries. We can observe 4 blobs: Code Directory, Requirements Set, Embedded Entitlements and CMS Signature.
Here is where theoretical part ends — now it should be easier to get what is happening in the actual code.
Let’s do some coding!
The complete example from this story is available as a Swift package from the Gihtub repository as I thought that the full, working example may help some folks.
Let’s start by introducing some API which we are going to expose. In this story we are going to expose the app’s entitlements as a property on UIApplication instances. For keeping API minimalistic and simple we will also expose only single “Entitlements” type with a nested Key structure and a single method allowing the API user to read values for particular keys. It is going to look like the one below.
public extension UIApplication {

    var entitlements: Entitlements { ... }

}

public class Entitlements {

    public struct Key {

    public static let apsEnvironment = Key("aps-environment")

    let rawKey: String

        public init(_ name: String) {
            self.rawKey = name
        }
    }

    public func value(forKey key: Entitlements.Key) -> Any? { ... }
}
At the very first we need to get our executable binary. That is going to be a straight forward task as the app’s Info.plist file specifies its filename explicitly, so it is accessible under the CFBundleExecutable key inside infoDictionary.
Here it is how we get the binary path:
public extension UIApplication {

    var entitlements: Entitlements {
        let bundle = Bundle.main
        guard let executableName = bundle.infoDictionary?["CFBundleExecutable"] as? String else {
            return .empty
        }
        guard let executablePath = bundle.path(forResource: executableName, ofType: nil) else {
            return .empty
        }
        // TODO: Read the binary and return the data :)
    }
}
For sake of readibility I decided to wrap a raw FileHandle, which we are going to use, into a simple utility class called ApplicationBinary. In that class we will handle opening and closing the file. The class will also expose the interface for reading data from different file parts via seek() method.
class ApplicationBinary {

    private let handle: FileHandle

    init?(_ path: String) {
        guard let binaryHandle = FileHandle(forReadingAtPath: path) else {
            return nil
        }
        handle = binaryHandle
    }

    var currentOffset: UInt64 { handle.offsetInFile }

    func seek(to offset: UInt64) {
        handle.seek(toFileOffset: offset)
    }

    func read<T>() -> T {
        handle.readData(ofLength: MemoryLayout<T>.size).withUnsafeBytes( { $0.load(as: T.self) })
    }

    func readData(ofLength length: Int) -> Data {
        handle.readData(ofLength: length)
    }

    deinit {
        handle.closeFile()
    }
}
We are going to need two flavours of data reading operations: the first one providing access to raw Data of particular length and the possibility of reading the chunks of particular type. We are going to implement all the parsing inside EntitlementsReader, which will own an instance of ApplicatonBinary and encapsulate all the Mach-O parsing logic.
class EntitlementsReader {

  enum Error: Swift.Error { ... }

  private let binary: ApplicationBinary

  init(_ binaryPath: String) throws {
      guard let binary = ApplicationBinary(binaryPath) else {
          throw Error.binaryOpeningError
      }
      self.binary = binary
  }

  func readEntitlements() throws -> Entitlements { ... }
}
Having the boring things done, we may put all the existing stuff together and let’s start reading the actual data!
public extension UIApplication {

    var entitlements: Entitlements {
        let bundle = Bundle.main
        guard let executableName = bundle.infoDictionary?["CFBundleExecutable"] as? String else {
            return .empty
        }
        guard let executablePath = bundle.path(forResource: executableName, ofType: nil) else {
            return .empty
        }
        do {
            return try EntitlementsReader(executablePath).readEntitlements()
        } catch {
            debugPrint("Reading entitlements failed: \(error.localizedDescription)")
            return .empty
        }
    }
}
As we already know, we should expect the binary to be one of two flavors: it could be either a fat binary or a single-architecture one. So, the very first thing we do is determining whether we deal with a fat one or not. If it is the single architecture one — we will also check if it targets 64-bit architecture. If we fail with single architecture one — then we will give a fat one a try. As we are not going to support fat ones now — we will just detect it. As you will see soon — adding the support later is not going to be that hard but won’t be needed now.
The algorithm here is simple: we are reading a chunk of data from the file and by checking the value of the magic field we are going to find out whether we are dealing with 32-bit or 64-bit Mach-O file. After we have detected the correct type of binary, we should record the header size and the number of load commands that follows it. It will be needed to process the binary in the next step, as we will need to skip the header data to continue reading. To encapsulate that data nicely I have introduced private enumeration type BinaryType with its nested HeaderData.
class EntitlementsReader {

 ...

 private enum BinaryType {
    struct HeaderData {
        let headerSize: Int
        let commandCount: Int
    }
    case singleArch(headerInfo: HeaderData)
    case fat(header: fat_header)
  }

    private func getBinaryType(fromSliceStartingAt offset: UInt64 = 0) -> BinaryType? {
        binary.seek(to: offset)
        let header: mach_header = binary.read()
        let commandCount = Int(header.ncmds)
        switch header.magic {
        case MH_MAGIC:
            let data = BinaryType.HeaderData(headerSize: MemoryLayout<mach_header>.size,
                                             commandCount: commandCount)
            return .singleArch(headerInfo: data)
        case MH_MAGIC_64:
            let data = BinaryType.HeaderData(headerSize: MemoryLayout<mach_header_64>.size,
                                             commandCount: commandCount)
            return .singleArch(headerInfo: data)
        default:
            binary.seek(to: 0)
            let fatHeader: fat_header = binary.read()
            return CFSwapInt32(fatHeader.magic) == FAT_MAGIC ? .fat(header: fatHeader) : nil
        }
    }

  func readEntitlements() throws -> Entitlements {
      switch getBinaryType() {
        case .singleArch(let headerInfo):
            let headerSize = headerInfo.headerSize
            let commandCount = headerInfo.commandCount
            return try readEntitlementsFromBinarySlice(startingAt: headerSize, cmdCount: commandCount)
        case .fat:
            return try readEntitlementsFromFatBinary()
        case .none:
            throw Error.unknownBinaryFormat
       }
  }

  private func readEntitlementsFromBinarySlice(startingAt offset: Int, cmdCount: Int) throws -> Entitlements {
    ...
  }

  private func readEntitlementsFromFatBinary() throws -> Entitlements {
      throw Error.unsupportedFatBinary
  }
}
Once we are here and we weren’t able to match the magic value to any expected value — we may also check if we are not dealing with a fat binary. We won’t cover that in this story and just throw a meaningful error but processing the fat binary would follow the same path as for any single-architecture binary with an additional step of determining the chunk in which architecture matches the current device architecture.
While we have determined the header size and the number of load commands — we are ready to play with the second section of the file. In that part our main goal is to find the load command which is defining the code signature location. As we have learned before — common fields of each load command are being described by load_command structure and they describe command type and size. We are going to iterate over all load commands, check if the command field has the value matching with LC_CODE_SIGNATURE. If not — we will skip rest of the load command and process the next one.
Once we have encountered LC_CODE_SIGNATURE — we can read it again but this time as a linkedit_data_command or we can alternatively just read the offset value.
class EntitlementsReader {

 ...

  private func readEntitlementsFromBinarySlice(startingAt offset: Int, cmdCount: Int) throws -> Entitlements {
      binary.seek(to: UInt64(offset))
      for _ in 0..<cmdCount {
          let command: load_command = binary.read()
          if command.cmd == LC_CODE_SIGNATURE {
              let signatureOffset: UInt32 = binary.read()
              return try readEntitlementsFromSignature(startingAt: signatureOffset)
          }
          binary.seek(to: binary.currentOffset + UInt64(command.cmdsize - UInt32(MemoryLayout<load_command>.size)))
      }
      throw Error.codeSignatureCommandMissing
  }

 private func readEntitlementsFromSignature(startingAt offset: UInt32) throws -> Entitlements {
  ...
 }
}
Having these values we can locate the data which we should treat as a Code Signature. We are pretty close to getting the entitlements now.
As I mentioned earlier — signature consists of some metadata at the beginning. We are going to encapsulate them into a structure called CSSuperBlob, which is followed by some number some repeating data that in our implementation are represented by CSBlob structure. For that part there are also two magic values needed. They are not defined in any publicly available header files, so we will have them stored as CSMagic structure static constants.
We are going to position our reader at the offset, where we expect Code Signature to be and validate magic value to check if it matches with what we expect to be there. Once we have matching values we iterate over CSBlob’s to check which of them has a magic value that matches the one for the entitlements part. Once we have found the blob, which magic value is the right one — we can read the entitlements size value and get the actual chunk of data that we looked for.
class EntitlementsReader {
  ...
      private struct CSSuperBlob {
        var magic: UInt32
        var lentgh: UInt32
        var count: UInt32
    }

    private struct CSBlob {
        var type: UInt32
        var offset: UInt32
    }

    private struct CSMagic {
        static let embeddedSignature: UInt32 = 0xfade0cc0
        static let embededEntitlements: UInt32 = 0xfade7171
    }

  ...

    private func readEntitlementsFromSignature(startingAt offset: UInt32) throws -> Entitlements {
        binary.seek(to: UInt64(offset))
        let metaBlob: CSSuperBlob = binary.read()
        if CFSwapInt32(metaBlob.magic) == CSMagic.embeddedSignature {
            let metaBlobSize = UInt32(MemoryLayout<CSSuperBlob>.size)
            let blobSize = UInt32(MemoryLayout<CSBlob>.size)
            let itemCount = CFSwapInt32(metaBlob.count)
            for index in 0..<itemCount {
                let readOffset = UInt64(offset + metaBlobSize + index * blobSize)
                binary.seek(to: readOffset)
                let blob: CSBlob = binary.read()
                binary.seek(to: UInt64(offset + CFSwapInt32(blob.offset)))
                let blobMagic = CFSwapInt32(binary.read())
                if blobMagic == CSMagic.embededEntitlements {
                    let signatureLength = CFSwapInt32(binary.read())
                    let signatureData = binary.readData(ofLength: Int(signatureLength) - 8)
                    return Entitlements.entitlements(from: signatureData)
                }
            }
        }
        throw Error.signatureReadingError
    }
}
And here we are! The last thing to do is adding a simple factory method on our Entitlements class, which allows us to instantiate the actual instance from raw data we just read. Entitlements data are stored inside the Mach-O binary as a property list, so we can just use PropertyListSerialization and have them seamlessly parsed to the format we need.
class Entitlements {
  ...

  class func entitlements(from data: Data) -> Entitlements {
        guard let rawValues = try? PropertyListSerialization.propertyList(from: data, options: [], format: nil) as? [String: Any] else {
            return .empty
        }
        return Entitlements(rawValues)
    }
}
That’s all! We have just extracted entitlements from the Mach-O binary! 🎉 I hope the story was an interesting journey and you were able to learn something new here. Thanks for reading!
If you found the topic of data included inside Mach-O binary interesting and you feel an urge to dig a little deeper — you may find the MachOView app helpful. It allows easy navigation over Mach-O files which was invaluable when implementing that solution for the very first time and helped me to solve some binary-related bugs. I simply owe Peter Saghelyi sharing his great work.